I finally got the final pose of the Ashtanga Primary Series! 🙂
I’m now on my 33rd class, 7th week into the practice.
Waking up in the morning has been a lot easier these days. I mostly go in the mornings but I usually practice in the evening on the Wednesday. It’s the day I allow myself to come in a bit more “prepared” for the practice. It’s also not crowded in the evenings.
Setu Bandhasana
This is not an easy version of the bridge pose. You obviously need to have strong neck and back to get into the full posture.
Normally I would use my hands to lift into my backbend before crossing my arms for the full pose. But it was not allowed, unless there is back pain. Although I couldn’t get into a deeper backbend this way, I was surprised to actually get into the pose on my first try.
That’s probably from all the backbendings. Which by the way has improved quite a lot since I started.
This was my deepest backbend before I started the Mysore classes. But I’ve been working on bringing the backbend higher to my mid-back. I’ll post my new upward wheel in another post.
My hard work has paid off! I hope to start the secondary series hopefully early next year! 🙂
The shala will be closed for the whole month of December due to renovation works. Unfortunately, they couldn’t get the first floor space for a few weeks before the year-end break. But we will have bigger practice space in the new year! ^_^
If you have been following Kino’s youtube channel, chances are you have heard her talk about maintaining an equanimous mind in your practice.
I would later learn more about this state of the mind in the 10-day Vipassana course.
Equanimity – Upekkha;Upeksha
Textbook definition:
Mental calmness, composure, and evenness of temper, especially in a difficult situation.
In the context of Vipassana meditation, Equanimity is defined as:
Observing sensations without craving for pleasant sensations and aversion for unpleasant sensations.
To be equanimous is:
be unwavering or to stay neutral in the face of the eight vicissitudes of life (the Attha Loka Dhamma):
gain and loss,
good-repute and ill-repute,
praise and censure, and
happiness and sorrow
In Vipassana meditation, you cultivate equanimity by understanding the law of impermanence (anicca;anitya). You understand that good sensations in the body are temporary, and so are the painful ones. You observe until they cease to exist.
The practice of Ashtanga yoga in Mysore style is an opportunity to observe and develop this state of mind.
How Equanimity Changed My Practice
The timing of my Vipassana retreat and the start of my Mysore practice could not have come at a better time.
Before the retreat, I have had a difficult time to act on my yoga teacher job hunt. There are just too many excuses. But never because I don’t want to teach.
One reason I held off on finding a teaching job was to gain experience in meditation. And I had the expectation that going to a meditation retreat will help me clear my mind and (hopefully) lead me to my path.
The day after I came back from the retreat, I attended my first Mysore class. Today is almost a month since that day.
My yoga practice has evolved since. And not just in the physical aspect.
1- Intention
My intention in starting Mysore practice was to find where I am in my Ashtanga practice in the physical aspect and improve myself in both self-practice and teaching.
Surely, I have a lot of postures in the Primary series that I struggle with, namely, Marichyasana C and D, Supta Kurmasana, and Garbha Pindasana. In my home practice, I would either modify or just skip the pose entirely.
So when I stepped into my first class, I conditioned my mind to accept everything without question. I allowed myself to be objectively reevaluated. To openly receive judgment and welcome change without objection.
This helps dissolve my ego.
2- Patience
By setting myself back as an Ashtanga beginner, I have learned patience.
I don’t have that long of an experience in yoga. In fact, it was only 6 months since I started that I went for the teacher training. And it has just been a year since I completed the 200-hr course.
And even though I have completed the Secondary series in the advanced training, all these experiences do not necessarily put me at an “advanced” practitioner level.
A month into my Ashtanga practice, I am still in Supta Konasana. I have made it past the difficult poses of the series (and happy to say I’m starting to ease into them). But one thing that’s changed since day 1 is that I no longer have the desire to complete the Primary series for the sake of completing it and proving myself. I take each day as a chance to re-live, refine, and build-up my practice.
The past weeks has helped me rediscover my practice. And it is quite different from how I have been trained in the past, both in alignment and approach.
Now, I don’t force myself into the pose within the 5 breaths. Sure, I take longer breaths than most practitioners in the shala because it gives me more fire. But now, I allow myself to slowly breathe into the pose no matter how long it takes. Because that’s what Mysore style is all about – self-discovery.
I no longer feel the “addiction” to learn or “collect” new poses, Ashtanga or not.
I no longer count my “improvement” by the time it takes me to get there.
I no longer envy masterfully-choreographed yoga poses flooding Instagram.
Patience helps me understand and respect my body. What it can and cannot do. Test the limits of my physical body and will power. Equanimity helps me find the balance between the two.
I know that by consistent practice, even by just the Primary series, I will have gained the strength and flexibility to prepare me for more advanced and, maybe once in a while, fancy postures.
3- Humility
I accept myself at the level where I am at the present moment for it teaches me the value of humility.
Watching (and admiring) the other practitioners puts my own practice into perspective. I have a long way to go. And it requires a lot of hard work. And a lot of patience.
What humbles me dissolves my ego.
Equanimity helps me breathe.
My breath teaches me Equanimity.
Here’s a video of Maria Villella showing the three poses:
Progression
It’s now my 15th day practicing the Ashtanga Primary series in Mysore style. I stepped into the shala with only the expectation of progression. I did not however think my practice will also be drastically transformed.
I’ve progressed quite enormously in the Marichi C and D (with the slight exception of D on the right side) where at times I would be able to bind and manage to maintain up to 4 full breaths before my arm pops out. My dear towels are there to the rescue. And I’d most probably be left out of the counting if I join the monthly led class. ^_^
I’m also slowly finding the movement and length in Supta Kurmasana. Even though I still need assitance to bind, being able to grip my fingers together for the full five breaths has been a great feat. Not to mention I no longer feel the anxiety being in this pose especially when they attempt to bring my feet together.
Each practice has brought me from not being able to keep both arms at my back at the same time to being able to bring my hands just a few more inches apart to grab on my own. I’ve learned to create the space and find the action to bring my arms under and around my legs. I’m still not there yet, but I surely will one day.
I no longer dread sliding my arms through my lotus legs in Garbha Pindasana. I’ve learned to accept the occasional pain of my forearm pressed against my calf. I’ve learned to be calm when it happens. And that it’s okay to try again.
It still takes me a few rolls more to go around 360 degrees, and occasionally falling on the side halfway through. But I learned how to get back up on my own, create the momentum and resume the roll. And finally balance in Kukkutasana with a bit more ease each time.
Transformation
James saw that I was putting unnecessary effort in my postures and transitions. I thought I was doing what I thought was expected of me since YTT. In a way, I’m glad I made this mistake.
I thought I was channeling energy. On the contrary, I was wasting it. That’s why I felt tired, mentally tired, halfway through the series. Sometimes I want to just skip the rest of the postures and start the finishing sequence. Thankfully I never gave in.
Now my practice has become more simple. And It has become a practice of patience. Continuously understanding how my body moves and responds to each breath, in each pose. Observing the sensations without reacting to them. It has given me the understanding in taking the first small steps to the lifelong journey of mind and body unification. Slowly integrating conscious awareness in my practice.
I’m finally starting to understand what practice should mean and should be. One’s own.
Garbha Pindasana (Womb Embryo Pose) and Kukkutasana (Rooster Pose)
In YTT, I only encountered these poses in the 500hr advanced module Ashtanga Intermediate. During 200hr we were introduced to the Primary series but we never got a full led class and I don’t remember having done Kukkutasana and Setu Bandhasana.
Even in the advanced module, probably only half or less, or maybe even just one could actually slip in to Garbha Pindasana. The rest of us would just slip in one or tuck our knees to our chest and roll. ^_^
I have huge thighs. I have huge calfs. Plus I have massive forearms (OK, that’s an exaggeration). At least for my size.
So in full lotus, there is just no way my arms, or anybody else’s arms could go through.
I have read a lot of posts about long term practitioners still not being able to slide their arms through. The one that hit me was one of Kino’s student that she wrote about here.
I’ve read about using water and oils to slide the arms through but I never really attempted to use those in my home practice. I thought my sweat are good enough. And no they weren’t.
I kind of gave up (even before really trying) on Garbha Pindasana. Anyway, no one is making me do it. And to finish with Kukkutasana sounded frightful as I remember being told to be “careful” when balancing in the pose as there is no way to free yourself as you fall down. And you either fall on your but (no problem!) or your face (OUCH!).
Everyone else is doing it.
I don’t recall seeing anyone being assisted into Garbha Pindasana in the days that I practiced there. Everyone would just happily slip their arms through and roll around their mats. Even the slightly heavy ones.
One day, while in Matsyendrasana (Fish pose), I observed the lady behind me in peripheral vision while she was holding the pose before the roll. Her ankles seem to contort in some ways which makes sliding in so easy. Maybe it’s my ankle?
Kino, who also has muscular thighs can ease in to the pose in a blink of an eye. But she has very open hips. Maybe it’s my hips?
I’ve watched countless videos how to create space for the arms and I have managed to find that small little space to pass my hand through but it gets stuck at the wrist. Maybe it’s my forearms?
spray spray spray!
So when Chelsea told me to jump through and come into Lotus, I knew it was finally coming! I warned her I’ve never done this pose in full, only half. And I had to explain what my half meant when I saw the look in her face. ^_^
What’s funny is that I actually planned to practice in shorts that day so I don’t need to roll up my crops when I bind in Marichi C and D. I finally decided against it and came in my usual crops.
I could only roll my crops slightly past half my thighs, it wasn’t gonna go any more past there. Chelsea then sprayed on my legs, and all sides of my hands (the forearm).
first attempt. fail. i told you so!
So I slid in my right hand first and it went just halfway through my forearm. Then my left hand. The left hand went all the way to my elbows as expected. So when she tried to pull my right hand more, I felt the pain on my right calf, as expected. Trying to remain calm, I told her my calf just won’t budge anymore.
I removed both my hands for a second try.
This time I slid my right hand in with the eye of my elbow facing forward as instructed. And it went through! And with the other hand in, I was in my first ever Garbha Pindasana! Hooray!
But since I still cannot hold my lotus fully into my chest, and my elbows are just slightly out, I can only hold my arms up as far as parallel to the floor. So I clasped my hands, as instructed, held the pose for 5 breaths and I was ready to roll!
Exhale and roll on the back, inhale roll back up swiveling the hip slightly to the right to turn clockwise.
Normally, you rock nice times clockwise in this pose which represents nine months in gestation.
On the last inhalation, use more momentum and rock up to Kukkutasana. Stay for 5 breaths. In Kukkutasana, there is a tendency to fall on your back, so keep reaching your chest forward keeping the palms firmly grounded for balance.
A video of Iain Grsak showing the full Garbha Pindasana and Kukkutasana. Watch how he jumps through!
Jumping back in Lotus.
This is still a huge puzzle for me. Just like in normal jump backs, I am still lacking the hip lift action to pass my legs through. All the more to hold the legs up in lotus and release them mid-air before coming down into Chaturanga.
Some day. 🙂
For now, I just can’t wait to complete the full Primary. Garbha Pindasana is the last one in my checklist to do. The rest of the series would be refinement.
My hope is only that I won’t have to progress through to the end of the series one pose at a time after this. ^_^
The other Pindasana
I have finally managed to hold my Pindasana (Embryo Pose) in the finishing sequence! Before today I would helplessly keep losing my balance and roll on my back.
I still need a lot of work to bring my knees as close to my chest as possible.
So in my previous post, I mentioned about a caucasian lady doing beautiful cross-legged jump throughs. Found out on Day 5 that she is actually apprenticing at The Yoga Shala. Of the three apprentices that day, I can tell she is very new at assisting as she doesn’t seem confident when she adjusts. And she doesn’t assist frequently. Or maybe there is some hours to assist before she can touch students at certain poses? I don’t know. (I just found out there are more than three of them! Some I’ve seen mostly practicing at the shala the intermediate series ^_^ inspiring!)
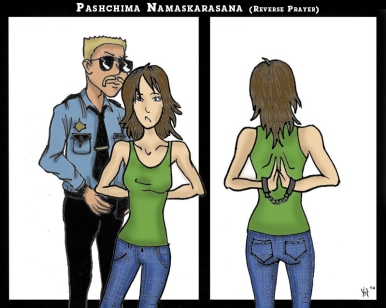
But she tried to help me in my Parsvottanasana.
I still find difficulty doing the Reverse prayer. Adding to my tight shoulders (main culprit), I also lack wrist mobility to turn my hands to point up without putting a lot of pressure to my pinky fingers. So when she (I ought to know the names of all the teachers next time I see them!) tried to help me, she basically couldn’t do much but release my pinkies which I took the difficulty trying to press together.
Why not?
I don’t blame her, adjusting people can be a daunting experience. Back at Tirisula, they also tried to help me with my reverse prayer and my hands just won’t budge no matter how much I relax them. That was almost one year ago! o.O
It’s still not a lost case. I’ve slowly managed to grip my fingers on the right side in cow face pose. The other side is still a painful work in progress. ^_^ Practice and all is coming!
Bhujapidasana
Another exciting progress for me was my Bhujapidasana. The previous day I got a really simple adjustment to my prep to Bhujapidasana in order for me to cross my legs with less effort (less effort BY more effort). This is a great way to build up the foundation of this pose.
Alexia Bauer in Bhujapidasana. I just fell in love with the beauty and strength she exudes in this posture.
Land on your toes vs entire feet. Why? I was ending up with almost straight arms which results to my legs sliding down. This was the best way to ensure my arms were bent.
Lift vs walk. I used to cross my legs by walking my feet slowly towards each other as demonstrated by Kino.
Ankles vs Toes. It’s about time I start crossing with my ankles if I want to go down into the full pose.Given the length (or the lack thereof) of my forearms, I don’t have enough clearance to bring my feet through. I used to cross with my toes to compensate the lack of strength to press on my shoulders (literal meaning of Bhujapidasana is Shoulder Press). The next important thing is to have the hamstring strength to lift the feet of the floor in the final pose.
Over time one can jump straight to the pose as shown by Maria Villella in this video:
I’m definitely going to work on this real soon! I’m still having sore wrist from all the jump backs and jump throughs -_-
Supta Kurmasana
This is the real winner for this day.
Since the beginning I have always struggled with poses that press against my shoulders and chest. This is one reason I never progressed in my Bhujapidasana as well. I hate the intense compression on my chest and shoulders. I probably have a really deep-rooted fear that I am yet to discover. ^_^
My Kurmasana isn’t so bad. Still need a bit of chest opening so I can go fully flat to my shoulders. My issue really is cannot move and press my legs as close to my ribs as I can without using my hands. I simply did not know how to do the action.
So to help me get a bind, James simply needed to use brute force.
Right arm first, he pulls it out and back as tight as he could. This was manageable. The second he brings the other arm out for the bind, I mustered all my courage to come back to my breath and relax in the pain. This should be the GOOD KIND OF PAIN, right? The kind of pain that makes me surrender to the moment without giving up. Remembering the lessons I learned during the Vipassana retreat: this too shall pass, and I will come out stronger. 5 breaths later he helped me up on my butt and swung my legs to jump back. That was the tightest I have ever been between my legs!
I know it will take me a while to bind on my own. Months. Probably years. But being able to hold the grip for the full 5 breaths has been the farthest I have come for this pose. Pain all worth it! Pain temporary!
Next step, feet behind the head. o.O
My Thoughts on No Props and modifications/variations
At The Yoga Shala, they follow the strict rule of not using props. No blocks, no straps. No towel allowed for my Prasarita Padottanasana C.
The only time a towel is used is to prevent the hands from slipping in Marichyasana C and D postures. Or maybe for some who cannot grip their big toes with the amount of perspiration.
Variations (beginner variations) are also not allowed. Such as prayer in Parivrtta Parsvakonasana, leg hug or stop sign in Marichyasana C and D. After all, you are practicing in Mysore style.
If they did allow props or variations, I would never be able to do Marichyasana C and D on my own in just a week. I would never be able to know what it’s like to actually grab and hold with your own hands in Supta Kurmasana.
One week at The Yoga Shala has allowed me to do all these things in less time than I would have if I had stuck to my variations and props.
That said, the important thing is knowing the right time to use props and the right time to leave them. And the right class.
I definitely don’t discourage props and variations for the right reasons.
But I strongly discourage the use of yoga socks and gloves. I also would discourage the use of the extra sticky mats (the really sticky ones). These don’t just hinder progression, but can possibly cause injury.
The first time I used the new Lululemon mat (The Mat) I was excited about how sticky it was that I actually recommended it to my students at that time. I have been looking for a mat that will prevent my hands from slipping even in Downward Dog. And my hands were not going anywhere on this mat!
However, I have experienced knee pain holding my Trikonasana (Triangle Pose) on the Lululemon mat (note that not everyone has the same experience with the same mat).
Super sticky mats make you use less isometric contraction (joint angle and muscle length do not change during contraction). As a result, practitioners tend to put their weight, pressure on the joints. Reliance on the mat to prevent your feet and hands from slipping will result in relaxed, weak adductor muscles.
Try out Trikonasana without your mat and feel the muscles you need you engage to prevent yourself from slipping.
However, I have seen a student with The Mat who could not hold his Pincha as his arms were slipping with the amount of sweat he has in his hands, and mat. It’s always a different story for everyone so try out different mats and see which one suits you best. 🙂
What about the skin?
In some ways the skin can be leveraged as a prop as well. Such as, when you are not [yet] drenched in sweat, the skin can help provide the traction to hold a pose.
Over time, you must develop the strength and technique, engaging the right muscles to hold the pose.
For example:
Vrksasana (Tree Pose) – hip abduction
Mayurasana (Peacock) – shoulder adduction
Arm balances such as Bakasana (Crane, the straight arm), etc – core
And so on
I will not discuss further on this topic in this post. But hopefully your own practice will teach you this important lesson as well.
Today is my first morning practice at The Yoga Shala. I usually go in the evenings but my evenings have been booked in the next few days. The Yoga Shala starts Mysore classes at 7am. My travel time is approximately 1 hour so being there at 8am sounds like a compromise.
The past three days I’ve met both Chelsea and Nadira. Chelsea is a no-non-sense kind of teacher while Nadira is generally relaxed and observes us from the back. They are both pretty strong to bind me up in Marichi C-D and Supta Kurmasana.
Until today, I’m still in Supta Kurmasana. I really have got to nail those Marichis! ^_^
Today, I arrived at the shala around 8:05 and there were about 8 students there already, some starting their finishing sequence. About half of the students were doing the Secondary series. James was there and and I saw Chelsea after I finished my Sun Salutations.
Two days back, Nadira had told me not to lift my wrist as I lengthen before jumping back. Today, James pushed me further down in my Chaturanga. I have noticed this low Chaturanga in Kino’s videos as well. I love my Chaturanga, but if it’s not right, so it shall change. I probably was doing it like in the second model below.
On day 1, I got a correction for my too long Parivrtta Trikonasana stance. Today, James adjusted my Trikonasana as well. It was still a bit too wide (below) and I was tensing my neck too much to gaze at my thumb. He told me to pull on my legs, not my neck ^_^
If you’re used to seeing wide stances like B.K.S. Iyengar or Jason Crandell, this may change your practice significantly! Each style of yoga has their own, well, style. So adjust yourself accordingly.
Also, the extension of the torso to the side must not take too long before dropping the hand. Just one simple movement of stretch and lower during the exhalation.
In my Parivrtta Trikonasana, he corrected me in a slightly different fashion. It started with a gentle question: “Why are your feet like that”? I was confused how to reply so I just said “That’s how it was taught to me”. Then he guided me how to do it.
There is really a lot of confusion on the alignment of this pose. But if you are practicing Ashtanga with KPJAYI teachers, expect the heel to heel alignment. And there is no point to argue if you think the hip-width distance makes more sense. If you come in as a student, be a student.
Most styles of yoga (especially vinyasa), correct me if I’m wrong, recommend the hip-distance stance. In Ashtanga and Hatha yoga, heel-to-heel alignment is taught. Widening the stance will definitely help a lot, especially beginner students. But as the flexibility improves, heel-to-heel alignment becomes easier to execute. Also, heel-to-heel requires better balance so expect a more intense practice with this alignment.
The next time James taught me was the jump through. I have been jumping my hips high since yesterday because Chelsea said I was not lifting my hips high enough. She made me jump to a pike handstand before I let my legs through.
Today though James told me I was lifting it too high. My knee was too far back that’s why I wasn’t going through easily.
The first thing I needed to do was to bring my knees in front first. Basically the action of tucking it in. Making sure the knees go past the shoulders before bringing the legs through. And as I develop the action to bring my knees closer to my chest as I progress in my practice, then I can do cross-legged pike. Later when I moved to the back of the room to do the finishing sequence, I saw a caucasian lady (quite slim, 40-ish) do the cross-legged jump through beautifully. 🙂 One day!
Now, into my Marichyasana C and D.
Chelsea assisted me for both the right sides of C and D. Surprisingly I can already bind myself on my own on the left side in C. And it’s just been Day 4! 🙂
It’s always a tug of war between Chelsea and my arms. ^_^ Usually my arms win and I would pop out of the bind. I love the way she says “Please” and “Thank you” when she’s adjusting.
For my left side of D, James came to assist. First he asked me if I drive, and again I didn’t know how to reply. Then he gave me the bicycle analogy. “Where do you look when you are biking”? I was almost going to say “back?” confused if he meant the time when you want to change lane. Stupid me. “Of course! You look where you are going!”. Now since I am going for a bind, I should look at my arms!
And to assist the motion of the bind, I need to put the back hand just slightly back and out. Not the way I was leaning to the back when I put my hand as if I’m already in a twist (which I learned from a coursemate during the YTT when I was just learning Ardha Matyendrasana).
“And stop looking back!”. I had to be reminded again and again while he helped me into the bind.
And contrary to what I learned, my face should only be facing where my chest is facing, and look only over to the back with my eyeballs.
The second cue that I got for this pose, and any other twisting pose was with the help of my towel. My very sweaty towel!
“How do you twist the towel”? I got this! Pull and twist!
So should the body lengthen before a twist. And I have been teaching this to my students. But when I come into this pose, everything just doesn’t seem to come together. Ahhh the struggle!
It was a really great adjustment, and a big lesson to be had. I hope I can master the actions to do this pose on my own soon. No more short legs excuse!
I also got great tips for Bhujapidasana and Supta Kurmasana from James. In another post. 🙂
This journey is truly a humbling experience for me, both as a student and a teacher.
Today I finally went to a Mysore class at The Yoga Shala (more information on the studio at the end of this post). This would be my first practice in a Mysore style in group setting after completing my teacher training early this year.
One small difference between this practice and my training would be the lineage. In our teacher training we learn Ashtanga as taught by B.N.S. Iyengar. So the mantras would be different, and some slight differences in the transitions as well as some poses (e.g. Utpluthih).
I have been planning to join one since coming back from holidays in July but put it off until after I come back from the 10-day meditation retreat. Until then, I continued with my home practice.
how i found the studio
There are only two KPJAYI certified studios in Singapore as of this writing: The Yoga Shala, and Ashtanga Yoga Shala.
I actually contacted the other studio first because it was nearer to my place and they had trial packages in case I won’t like Mysore. But they seem to have been reorganizing their partner studios (i counted three) at some point and I got an email reply only after almost a month, only to give me to another email to contact (I usually don’t call unless it’s urgent). Oh, well.
First Impressions
Finding the studio was a breeze. Their website even has a very animated video on how to get to the studio. Check it out below, it’s too cute! 😉
I called the studio a few hours before to confirm if they are still open (haze averaging at 180 -_-) and if I needed to book ahead. I got forwarded to voice mail twice but finally got a return call an hour or so after.
I was the fourth person to arrive. There was already one practitioner in the studio when I and the other two arrived. They provide free mats if you don’t have one of your own.
When I took my space, I was asked to put my water bottle away. No water bottles are allowed in the practice area. Or probably more like, no drinking of water during practice! ^_^ This was definitely a first for me. I usually get dry throat after a few minutes of Ujjayi breathings. And especially on a hazy day like this, I wasn’t sure I was going to survive until the end without a drop of water.
The Practice
Chelsea was the teacher in charge for the class. She let me go through the poses to see where my practice is at. She would stop me at Supta Kurmasana later.
While doing the Sun Salutations, I was not sure what to do with my hands in Samastithi. I’m used to keeping them in prayer, but I’ve seen most Ashtangis drop them on the side. So I was kinda mixing them a bit but I guess this wasn’t such a big deal as I was not corrected (or maybe, yet).
After Trikonasana, I went back to Samastithi as usual before turning to Parivrtta Trikonasana. I got my first correction. So I tried to make sure I remember that cue for the Parsvakonasana. In my Parivrtta Parsvakonasana, I usually stay in prayer as I cannot lock my knees with my elbows. Chelsea encouraged me to go all the way anyway, as I could reach the floor. Although I told her I won’t be able to lock my knees in she said it is fine. My left side is usually able to hold better than the right as I can twist better on the right side.
I breezed through the standing poses and then I jumped through. Ah! Not allowed to lift my wrist! So I settled with the cross legged jump through even though my feet could not completely stay afloat. She reminded me to try to keep my bum off the floor first before lowering all the way down. Finally she did the “luksong tinik” on me to make sure my feet dont touch her legs when I press to jump. She basically put her legs right below my hips while I was in downward dog and I have to jump high and over without touching it. She did this to me about three times. I know I could jump over but the lowering down and through slowly will still need a lot of work. At times I would jump and land halfway through on my feet and butt. I just have to try again and again. 🙂 I am giving myself the full month to master the jump through. Yoshi!
She also asked me to put my hands off the floor in Paschimottanasana C. The variations for this posture has been confusing to me as different guides show different variations. Some have 3, some have four up to D. I should go back to that full video by Kino again.
A minor adjustment in Marichyasana C was to keep my Marichi foot further out contrary to our training which was to keep it a first distance away. For B I was told to keep my head between my legs, as I put my head just in from of the half-lotus leg ^_^
I have always had difficulty with binding in twisted poses so coming into the Marichi C and D I knew I will need assistance. For a while I have always had the impression that my legs are too short for me to bind around securely. I’ve also never been successfully assisted during my teacher training. Chelsea however, did! For both! She saw my problem was my wrist mobility. I always get my hand stuck on my leg as I wrap around preventing me from extending further. Although the D is still stubborn and still keeps slipping out, at least this gave me the confidence that even short legs, short arms can bind! 😀
Chelsea also made me open my hands wider for Bhujapidasana. And as I expected, to cross my legs at the ankle and not lock on my feet. I’ve never really been able to comfortably go all the way down to the full expression of the posture without either having my feet stuck, or landing hard on my forehead.
Kurmasana was alright, except for my hands which were too wide open and far from the mat. The Supta Kurmasana however was a totally different story. Add binding around the thighs and leg behind the head. I just can’t get my hands to wrap seamlessly behind and my legs are too wide open to get a clasp. From there she told me to stop and start with the finishing sequence. I have to be able to nail Marichi C, D and Supta Kurmasana before I can continue with the rest of the series.
The finishing sequence also requires the drop back. I can drop back, but not the way they want it to be done. I am not supposed to tilt my pelvis any more forward than a few inches. I don’t really have a flexible back so when she blocks my hips, I can only bend so far I cannot even see the people behind. Plus, my tight shoulders prevent me from reaching far back for the fall. I honestly don’t know how this will happen for me, so I’ll just leave it to the practice.
Tomorrow will be another day. 🙂
About The Studio
The Yoga Shala is owned by James Figueira (KPJAYI authorized Level 2).